
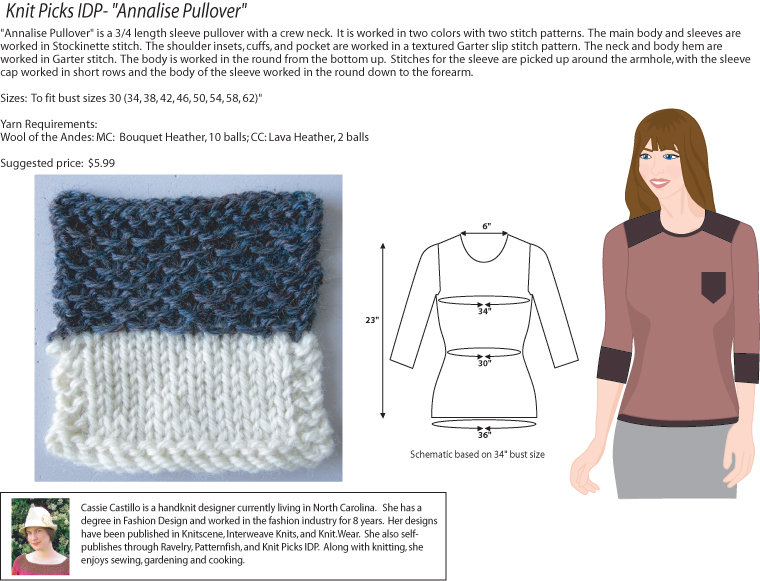
At my weekly knit group we always share the projects we are working on. Most people show the pattern photo and hold up their work in progress. I’m usually working on a new design, so all I have to show is a half-drawn pencil sketch. Most of the time, everyone is unimpressed. They say, “But, how do you know what will it look like?” I tap the side of my head. “It’s all up here; I can see it finished!” That is how it works when you are a designer, you can visualize your finished product before you’ve even picked up your needles. The conversation usually continues like this: “You’ve got your drawing… so how do you turn it into a pattern?” I think for a second and say, “Well… that is the hard part!” You see, that is a question that can’t exactly be answered in a couple short sentences. Getting from sketch to sweater is many steps that takes skills I’ve honed over the years. Despite what some people think, there is no ‘magic program’ that will write a sweater pattern for you; it is a lot of hard work! Hard work that involves lots of math! Luckily for me, I love math. Almost as much as I love knitting! (Ok, maybe not that much.) So I thought I would share with you the entire process I went through, from sketch to sweater, for my newest sweater pattern Annalise Pullover.
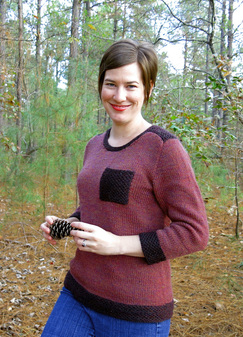
It all started when I was watching my favorite tv show, Once Upon A Time. I was re-watching the first season on Netflix. During a brief scene, I looked up from my knitting and noticed Mary-Margaret was wearing a very pretty sweater. It was a simple pink pullover with black trim at the neck and cuffs. I had seen it before, since I was watching a re-run, but for some reason it really struck me this time around. I could make that! In fact, I really wanted to make that! But to make it even better, I’d add a few details, like a pocket and a textured stitch. So I dropped my knitting and grabbed a piece of scratch paper and started drawing furiously. Here is my pencil sketch that I ended up with:
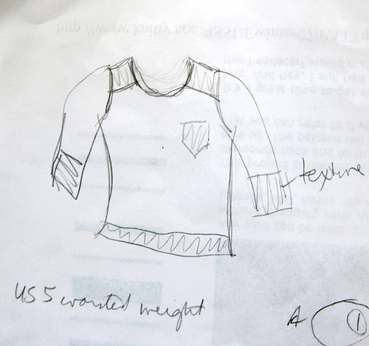
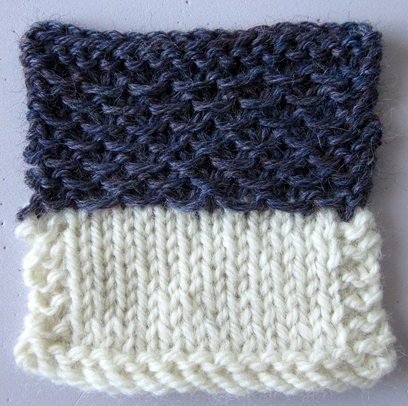
Not too impressive, right? Well, as long as I know what all those doodles meant, I don’t have to be a fine artist. The next part is working on my swatch and picking my contrasting stitch pattern. Now the design starts to come alive! I scoured my library of stitch pattern books, and swatched up several stitch patterns. After laying them side by side and comparing, I decided on a Garter slip stitch pattern. It was easy to work, was only a multiple of 2 stitches, and the resulting fabric was nice and thick with an interesting texture. Perfect for this project!
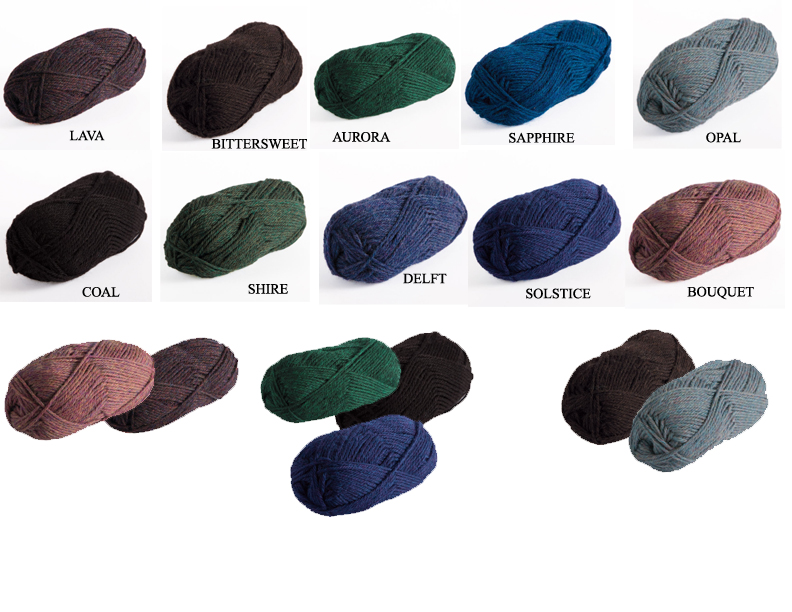
I had made my swatch in plain worsted weight wool, my favorite kind of yarn to work with. I had planned on submitting this sweater to Knit Picks’ Independent Designer Program, so I would be asking for yarn support. Time to work up a proposal. A design proposal includes a sketch of the design, a swatch of the stitch patterns you will use, a description of the design, and a simple schematic. I like to digitally render my sketch in a drawing program (Adobe Illustrator) since I still have the hand drawing skills of a 5-year-old. I decided to use Wool of the Andes, so I had many colors to choose from. Initially, I had wanted to use an emerald green and black, but when I rendered my sketch in those colors it looked like a Star Trek uniform. Oops! I picked out the colors that really spoke to me and made a color board to compare them.
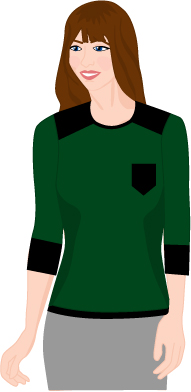
No Star Trek uniform, please.
| 
|
After lots of re-arranging, I chose Bouquet and Lava, the color pair on the bottom left. I hadn’t intended on making myself a pink sweater, but it was a dusty subtle pink that I thought would look good. I even asked my husband his opinion on the color choices and surprisingly, he picked the pink as well! So that settled it, my design would be pink. Here is the finished proposal:
Now it was time to wait and see if my design was approved by Knit Picks. A few days later, I got my approval and just had to wait for my yarn to arrive in the mail. The next week, a brown box appeared on my doorstep. I opened it and found very lovely dusty mauve and very dark burgundy yarn inside. Thankfully the colors were just as beautiful as they looked online, and they looked great paired together. Time to swatch again, this time for gauge!
Gauge all calculated, now it was time to work on the sizing. I think this is the part that really has people mystified. How do you know what size and shape to make it? Practice, my dear friends. Over the years I have read many, MANY knitting patterns, and after awhile you start to notice a sort of formula for the way it goes. Also, I am lucky to have a degree in Fashion Design and took lots of pattern drafting and draping classes, so I’d like to think I have a good idea of how to wrap fabric around the human form. And let me say, we are shaped in a pretty odd way. While not skintight, Annalise does have waist and bust shaping, so I will have to use some sort of shaping from hips to bust. Then I will have to shape the armholes and the neckline. But how do I know what numbers to use? Well, I use a sizing chart. My favorite one is from Ysolda Teague’s blog, which has since disappeared since she reformatted her blog, but you can still find it on Pinterest. https://www.pinterest.com/pin/526710118889474657/
I pick the base size for my sample, which in this case is a bust size of 34”, and start from there. The measurements on the chart are for the actual body size, so it is necessary to add or subtract the amount of ease you want. For this sweater I wanted no ease in the bust and hips, but a bit of positive ease in the waist so that it isn’t fitted like a corset. I used to figure out all the measurements for each size by hand, with just a calculator, pencil and paper. Let me tell you, it took HOURS. This is where my love of math comes in, because nobody in their right mind is going to spend a Saturday calculating 8 sweater sizes. Nobody except, maybe, me. But, thankfully, I found the Sizing Knitwear Patterns class on Craftsy, where you learn to use Excel formulas for calculating the different measurements for each size. It is still not as easy as clicking a button and having the computer do all the work, but it has cut the amount of time I spend on grading at least in half. So I went from about 10 hours down to 4-5 for calculating 6-8 sweater sizes. I try to go through the sizing steps logically, as I would knit the sweater. Annalise is worked in the round from the bottom up, so I begin with the cast on measurements and go up through the decreases for the waist then the increases for the bust. I determine most of my measurements from the chart, but some of them, such as the body length and neck depth are my own personal choice. Along with the sizing chart, I refer to some of my sweater design books on various aspects of shaping. I’ll add a list at the end of this post of the books I use the most.
After finishing all the measurements, I write the first draft of my pattern. I prefer to hand write it in pencil, because inevitably there is something I will change, or I will find I left a step or two out. I’ve learned over the years that it works out best to write out the complete pattern first, then knit the sample and note any changes along the way. Occasionally I have to change something completely, so I scratch out an entire page and just re-write it. I always take lots of notes, especially on stitch and row counts. A week or two after finishing the sample, I go to write the final pattern and I might not be able to remember if I ended on a right side or wrong side! Also, the sample knitting never goes smoothly. I expect to rip out at least once. For Annalise I had intended to work the front and back yokes separately, but when I went to graft them together I didn’t like how the seam looked, so I ripped back and changed it to be all one piece. Also the pocket originally had a point on the bottom, but I didn’t like how it looked, and the instructions were unnecessarily complicated, so I changed it to a straight bottom.
The sample is finished, now it is time to write the pattern. Remember all those notes I took while knitting the sample? Now they will come into play. Knitting patterns have their own language, and it seems that each designer or magazine or book has it’s own dialect. Someone once said to me “When you write up a pattern, you’re just publishing your notes, right?” Um, no. It is much more complicated than that, especially if I’m writing a pattern for a magazine. For my self-published patterns, I write how it naturally comes to me, which is pretty easy to do. The only thing I have to look out for is consistency in my writing style. I can’t say ‘work in patt’ at the beginning of the body and later on write ‘cont in patt’. It might not bother some people, but I like to be consistent throughout, and I usually reference other patterns I have published to keep the same phrasing. When I’m working on a pattern for a magazine, they will send me a style guide to work from, and it usually includes a list of phrases to use. Sometimes their style is so completely different from my own I feel like I’m writing the pattern in German and I have to struggle a bit to get through it.
After the first draft of the pattern is complete, I make the schematic. I go back to my spreadsheet and look at the final measurements. I already had a basic schematic drawn up for my proposal, so now I just add the final measurements for all the sizes.
Now comes a very important part that I think many knitters don’t know about. I send my pattern off to my tech editor. What is a tech editor you say? A ‘technical editor’ checks all the technical aspects of the pattern. Do my numbers add up and make sense? Do I use consistent phrases and formatting? Is my grammar correct? Are the instructions clear? Hopefully the answer to all those questions is yes. No matter how many times I check the pattern myself I always miss something, so a tech editor is a must-have.
I usually send my pattern to the tech editor with placeholder photos taken on my dress form. While I’m waiting for the edits to come back, I take the time to do the real photography. I usually play both model and photographer, so this is the part that takes a long time and gives me the most frustration. I’m not a good model, and definitely not a good photographer, so I try to have patience with myself. I wrote a previous post on my photography session for this design, so I won’t get into the details too much. But I will say that it involves taking several hundred photos just to get a few good ones.
After I am satisfied with the photos and get the edits back from my tech editor, the pattern is done! Yay!!! Then I go online and publish it on Ravelry, Craftsy and Patternfish. Annalise is also part of the Knit Picks IDP, so I also sent it off to them and wait for it to be posted on the Knit Picks website. So much goes into one pattern, but it is so satisfying to see knitters around the world enjoying my work.
Here is the list of knitwear design books that I really like:
Designing Knitwear by Deborah Newton
Finishing School by Deborah Newton
Knitwear Design by Shirley Paden
Sweater Design in Plain English by Maggie Righetti
The Principles of Knitting by June Hemmons Hiatt
Knitting Pattern Essentials by Sally Melville
Knitting the Perfect Fit by Melissa Leapman
Knit to Flatter by Amy Herzog
Have any other questions about the knitwear design process? Post a comment, I will be happy to answer.


 RSS Feed
