Azalea and Rosebud Knits
  • Blog
  • Patterns
    • Hats >
      • Roelle Hat
      • Winterset Hat
      • Design Your Own Hat
      • Valentine Cables Hat
      • Kilbourne Hat
      • Etoile Hat
      • Glenrowan Hat
      • Button box cloche
      • Adora Hat
      • Aster Hat
      • Argyle Cabled Beret
      • Zoey Star Beret
      • Cairo Hat
      • Honeycomb Hive Hat
      • Lakkos Cloche
    • Pullovers & Cardigans >
      • Noemy Pullover
      • Yvaine Cardigan
      • Daiva Cardigan
      • Trail Henley
      • Salisa Cardigan
      • Thara Cardigan
      • Dealla Cardigan
      • Shiloh Sweater
      • Katrina Pullover
      • Liana Cardigan
      • Jocasta Pullover
      • Edythe Pullover
      • Ripple Edge Cardigan
      • Kaleidoscope Pullover
      • Sunsine & Rain Henley
      • Begonia Pullover
      • Climbing Rose Henley
      • Irisa Cardigan
      • Makalu
      • Sinai
      • Sand Dollar Cardigan
      • Nopales
      • Lava Rock Cardigan
      • Sharee Cardigan
      • Annalise Pullover
      • Starbrook Pullover
      • Rosemary Cardigan
      • Alison Pullover
      • Edelweiss Cardigan
      • Minnette Pullover
      • Erte Cardigan
      • Nocturnal Pullover
      • Morrison Cardigan
      • Wessex Cardigan
      • Valhalla
      • Leftovers for dinner
    • Tees & Tanks >
      • Cowesett Tee
      • Janesse Pullover
      • Kayleen Pullover
      • Tiye
      • Dahshur
      • Rhodora
      • Jacaranda Tunic
      • Sakura Tee
      • Sunburst Tee
      • Lindell Tee
      • Adeline Camisole
    • Vests & Shrugs >
      • Elephant Vest
      • Elephant Safari Children's Vest
      • Rimrock Vest
      • Bartram Vest
      • Karnak Vest
      • Dark Lotus Shrug
      • Lancero Vest
      • Aster Vest
      • Olexa Vest
      • Morocco Vest
      • Loretto Vest
      • Camellia Shrug
    • Shawls >
      • Nadina Shawl
      • Janelle Shawlette
      • Nile Valley Shawl
      • Ciara Shawl
      • Emmylou Shawl
      • Graciella Shawl
      • Djoser shawl
      • Desert Waves Scarf and Shawl
      • Blackberry Mist Shawl
      • Mariposa Shawl
      • Technidream Shawl
      • Log Cabin Shawl
      • Rosana Shawl
      • Siren Shawl
    • Scarves & Cowls >
      • Zohra Cowl
      • Esna Cowl
      • Avery
      • Lavienne Scarf
      • Joselyn Cowl
      • Jayda Cowl
      • Raissa Cowl
      • Rosewood Cowl
      • Lilka Scarf
      • Hoptree Scarf
    • Gloves >
      • Roelle Gloves
      • June Mitts
      • Cranberry Mitts
      • Cabled Heart Fingerless Gloves
    • Skirts >
      • Lucine Skirt
    • Jewelry & Other Accessories >
      • Inez Necklace
      • Bettina Headwrap
      • Saqqara Necklace
      • Endira Necklace
      • Lapis Cuff
      • Athena Headband
    • Stash-busting
  • Tutorials
    • Entrelac Tutorial
    • Double Knitting tutorial
    • Honeycomb Cables without a cable needle
    • Twisted stitches tutorial: k1tbl & p1tbl
  • eBooks
  • About
  • Contact

New Pattern: Wessex Cardigan

2/26/2013

0 Comments

 
Picture
Picture
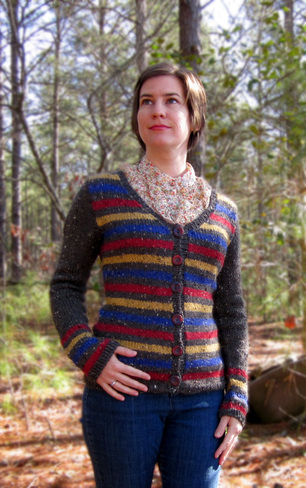
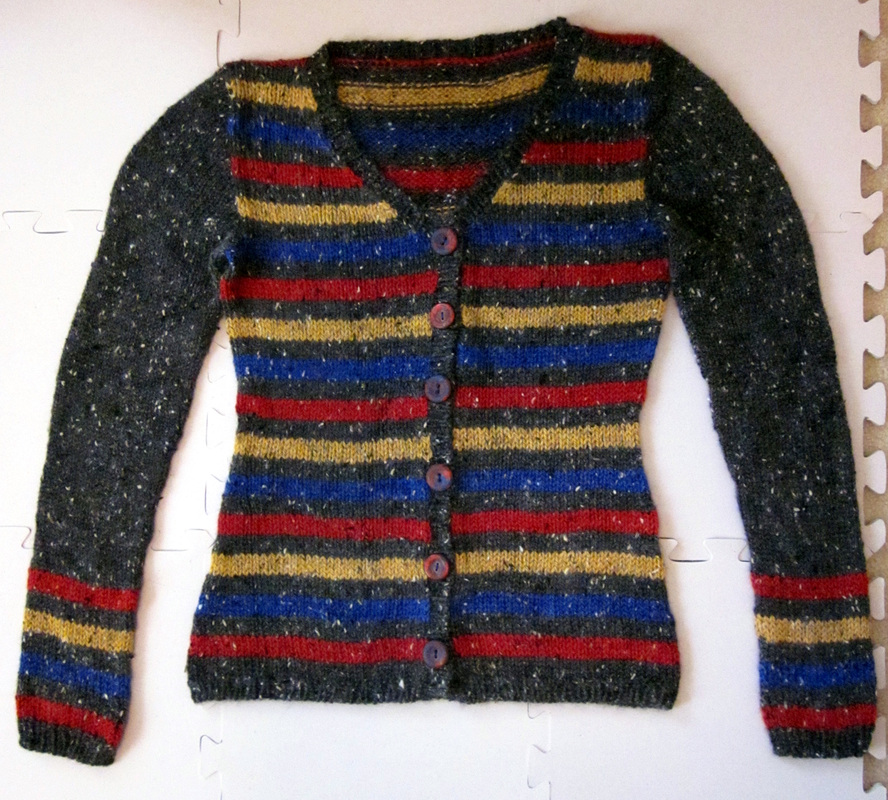
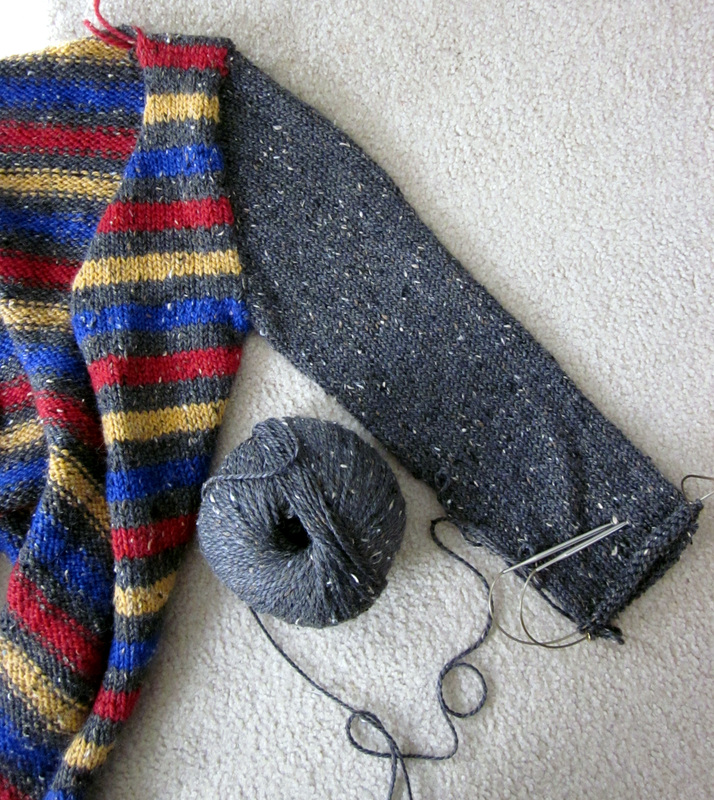
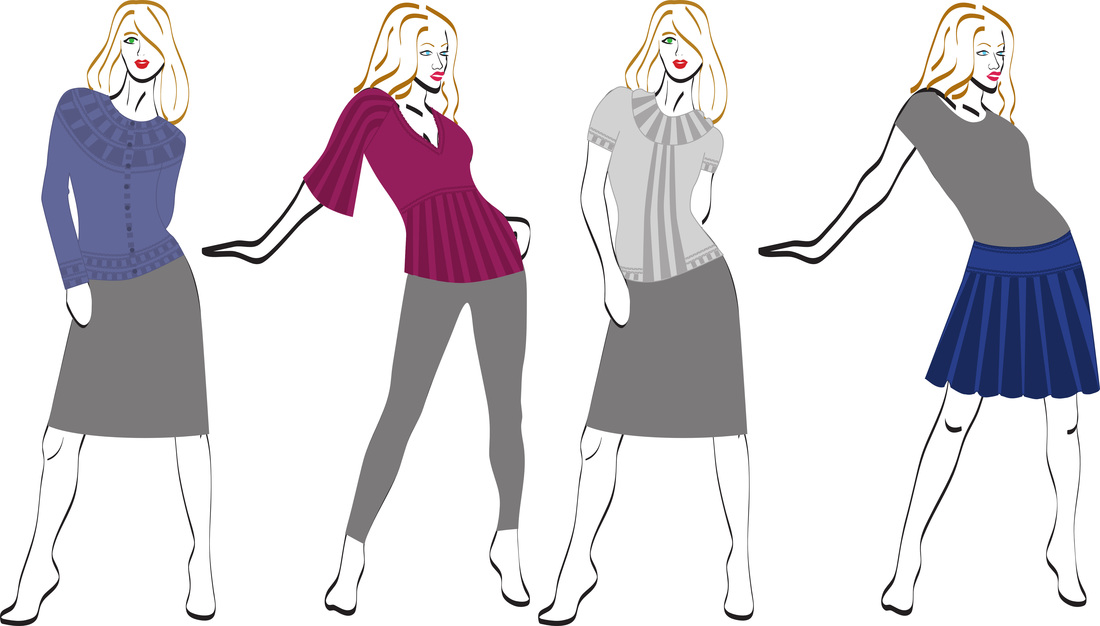
I am very happy to introduce to you Wessex Cardigan!  Worked in a four color stripe pattern, the Wessex Cardigan has a fitted shape and flattering V-neck. The body is worked flat in one piece from the bottom up. Solid color sleeves are begun with stitches picked up around the armhole and worked in short rows to form the sleeve cap, then worked in the round down to the wrist. A small section of stripes is worked at the sleeve cuff. This cardigan is meant to be worn with little or no positive ease in the bust.

Lately all my garment patterns have been for magazines, so I decided it was time to self publish a cardigan pattern.  V-neck cardigans are my go-to sweater, especially when worked in a soft and warm yarn like City Tweed!  Creating color palettes is a secret passion of mine, and for this pattern I chose bright elementary colors paired with a neutral grey.  The flecks of tweed in the yarn tone down the bright colors and make a much more interesting fabric.

FINISHED MEASUREMENTS
Chest: 31 (34, 37, 40)[43, 46, 49, 52]”
Length: 23.5 (24, 24.5, 25)[26,26.5, 27, 27.5]”

MATERIALS
Knit Picks City Tweed Aran/HW (55% merino wool, 25% superfine alpaca, 20% Donegal tweed; 164 yds/150 m per 100 g ball) Color A: Orca (grey), 4 (5, 5, 6)[6, 7, 7, 8] balls;
Color B: Romance (red), 1 ball; Color C: Cobalt (blue), 1 ball; Color D: Lemon Curd (yellow), 1 ball.

NEEDLES
US #8/5 mm 16” and 24” circular needles and set of dpn
US #7/4.5 mm 24” circular needle and set of dpn

NOTIONS REQUIRED
6 one inch wide buttons
Sewing thread to match buttons
Sewing needle
3 stitch holders (or waste yarn)
Tapestry needle to weave in ends
2 removable stitch markers or safety pins
2 stitch markers

GAUGE
16 sts and 22 rows = 4” in Stockinette Stripe using larger needles

SKILLS NEEDED 
tubular cast on 
three needle bind off 
RLI (right lifted increase) 
LLI (left lifted increase) 
k2tog 
ssk 
p2tog 
ssp 
short rows 
picking up stitches 
working in the round

$6.00
0 Comments

Vintage Inspiration: Army Sweater

2/17/2013

0 Comments

 
Picture
I love thrift store shopping.  You really never know what you're going to find!  Living in a town with a military post means finding lots of military issue clothing in the thrift stores, from fatigues to dress uniforms.  A couple days ago while thrift store shopping my husband snuck up behind me and whispered, "Hey!  Look what I found!!"  He handed me this sweater.  It had a government issue label inside and was obviously quite old but in good condition.  It is a size 42-44, olive drab lightweight and somewhat scratchy wool pullover.  I thought the yoke and collar combo was really interesting.  I bought it and brought it home.  

For being a size 42-44 it really wasn't that big on me (size 34).  It fit just like a comfy sweatshirt, and I think once it is washed with a bit of Eucalan (see previous post!) I think it will soften right up.  

A bit of Googling seems to suggest that this is a WWII era sweater.  I can just imagine my grandfathers, one in the Pacific front, and the other in North Africa, wearing these sweaters under their uniforms.  I had a hard time finding information on standard issue clothing, but I'm sure there is lots of information out that there I just didn't find.  The thinness of the fabric would suggest to me that this was one of many layers worn with the uniform, and for the soldiers in Bastogne and other cold parts of Europe I'm sure they were happy to have them.  If anyone reading this knows of any resources on WWII uniforms I'd love to read about it.  History of costume is one of my particular interests; I like to know the 'whys' behind what we have worn throughout history.

0 Comments

How to Wash Your Hand-knits

2/9/2013

0 Comments

 
This afternoon I finally finished the striped cardigan I've been working on for the past month.  The final step was to wash and block.  I had a few other hand-knits to wash, namely a hat and a dog sweater, with all being made from wool.  I had to think about the best way to wash them all, and decided to write a post about washing your hand-knit items.

The first thing to do is check the instructions on your yarn band.  I think most yarns will say to hand wash and lay flat to dry.  Superwash wools can be machine washed and dried, but even then I tend to wash by hand.  

Next is picking out your wool wash.  I like to use Eucalan; it has lanolin (which softens animal fibers) and has a nice eucalyptus scent.  I have also heard good things about Soak wool wash.  But please, please, DON'T use Woolite!  Yes it has wool in the name, but it contains harsh chemicals that are not good for wool.  Also do not use regular laundry detergent for the same reason.  If you don't have any sort of wool wash and desperately need to wash a hand-knit you can use plain old hair shampoo with a bit of conditioner mixed into the water.    If you use shampoo and conditioner you will need to rinse out your hand-knits after washing.  The nice thing about wool washes like Eucalan and Soak are that there is no need for rinsing.

So now that you have your wool wash, where do you want to soak your hand-knits?  This really depends on the size of what you are washing.  

Small items (a hat, a pair of gloves, etc):  These can be washed in the sink or in a bucket.  Plug the sink or get out your bucket and add a bit of wool wash.  I usually use a dab the size of a quarter.  Fill the sink (or bucket) 3/4 full with water that matches the temperature listed on your yarn band.  I usually knit with plain wool yarn, so for me it is usually lukewarm water.  If you are washing something made from animal fibers you probably do not want to use hot water.  If you use hot water you run the risk of felting the item you are washing.  Now gently push your hand-knit into the water.  Hold it down on the bottom of the sink/bucket until it is completely submerged and there are no more air bubbles coming to the surface of the water.  Don't agitate your hand-knit; this is another factor that contributes to felting.  Now let your hand-knit soak for a few minutes.  Time to go empty the dishwasher, fold the laundry, or some other housekeeping that we generally avoid doing to get more knitting time.  

After a few minutes release the water.  If you are using a sink this is done simply by opening up the drain.  If you are using a bucket, then tilt the bucket to the side and pour out the water.  Support your hand-knit with your free hand when you need to turn the bucket all the way upside down.  Gently push down on your hand-knit against the side of the sink or wall of the bucket to push out excess water.  To really get out excess water you can place your hand-knit on the edge of a bath towel, roll up the towel like a jellyroll and stand on it.  If you're like me then you take this opportunity to pretend you are a tightrope walker in the circus.  Now unroll the towel and lay your handknit on a dry towel and place it somewhere out of the way so it can dry in peace.  You can also use a foam blocking board for drying, this will help keep your carpet from getting wet.  If you are washing something very small you can use a salad spinner to help get out the excess water.  I would recommend dedicating a salad spinner for washing hand-knits; I don't think Eucalyptus flavored salad would taste very good.

Large items (a sweater, a shawl, etc) or multiple items: These can be washed in the washing machine.  Or, I should say, the washing machine can be used for soaking.  Get out your wool wash and adjust the water level to the appropriate setting (probably small on a warm/cold cycle).  As the water starts to pour in add a dab of wool wash.  Keep the lid open and wait for the water to stop.  Then gently push in your hand-knits and hold them down, one at a time, until there are no more air bubbles coming to the surface.  Now here is the important part: turn off the washing machine and keep the lid open.  If you close the lid you and forgot to turn it off, you might get some agitation and more water coming in.  You definitely don't want to felt those projects you worked so hard on!  Let them soak for a few minutes.  When you come back, turn the wash cycle to spin only and pull out the dial to start.  Definitely make sure that it is on spin only and not a rinse cycle.  Once the machine has stopped spinning you can take out your hand-knits, being careful to support them with both hands so they don't get stretched out.  Now lay flat to dry on a towel or foam board.

Easy, right?  Here is my sweater that made a trip through soaking in the washing machine.  It is now drying peacefully on a foam blocking board.
Picture
0 Comments

Thanks to Short Rows and Other Craftsy Classes

2/5/2013

0 Comments

 
Last night, while I was sitting with the ladies of my local knitting group, I was thinking about short rows and how thankful I was that I had learned how to knit a sleeve from the top down using short rows for the sleeve cap.  I first read about this method in the book Knitting From the Top by Barbara Walker, but I found the instructions a bit vague and confusing.  While it is a great book, I really needed more information.  Then I heard about Carol Feller's class on short rows on Craftsy.  I had taken a class online awhile back (not on Craftsy) and was disappointed with the results, so I was a bit hesitant to try it again.  But I soon found that the short rows class was free, so what did I have to lose?  

I signed up and found that the Craftsy class platform is really amazing!  The lessons divided into separate videos and if you stop partway through and close the page, the video will 'remember' where you were and start again in the correct place when you come back.  There are printable class materials to follow along with, so that is great if you are like me and want to read it and see it at the same time.  You can post questions and get answers directly from Carol and other members of the class.  

Carol teaches several methods for forming the short rows and shows very clearly how to process the wraps when it comes time to knit (or purl) the wrapped stitches.  This is one of the things that always confused me about short rows-- what the heck do I do with those wraps???  Her videos are very clear and easy to understand.  This class really conquered my fear of short rows and wrapped stitches.  

The last lesson was the most useful to me; she demonstrates how to work sleeve caps in short rows.  You end up with a smoothing fitting sleeve that can be tried on as you go.  No more sleeves that are too short or too long!!  Right after taking this class I told one of my knitting friends about it and she signed up immediately and now knits all her sleeves using the short row method.

Here is a picture of the cardigan I am working on.  It uses Knit Picks City Tweed HW in four lovely colors.  Pattern will be released later this month!
Picture
After such a great experience with the short rows class I signed up for two more Craftsy classes.  The first was Shoot It! A Product Photography Primer by Caro Sheridan.  I'm really terrible with taking photos and Caro's class was really great for learning how to photograph your handmade items.  Caro tells you flat out that you don't need a fancy camera to take great photos.  I use a simple point and shoot camera (Canon Powershot) and didn't think I would be able to take professional quality photos.  After this class my photos have improved vastly; I actually re-watch several of the lessons before every photo shoot just to refresh my memory.

The second class I signed up for was Sizing Knitwear Patterns by Faina Goberstein.  Some work obligations made me put this class on hold for awhile, so I'm still working my way through the lessons.  As a designer, this class has a lot of valuable information when it comes to grading a pattern into various sizes.  Faina shows you how to make a spreadsheet (in Excel or similar programs) and use formulas to help calculate the sizing.  While you can't just push a button and have the whole pattern magically graded, it is much faster than just using a calculator and piece of paper.  I'm almost done with my workload so I hope to get back to this class soon.

Time to stop writing about knitting and actually go knit something.  Until next time, Happy Knitting!
0 Comments
    Azalea & Rosebud Knits
    Picture

    Author

    Cassie loves to knit, read and cook.  She sometimes does all three at the same time.

    Picture
    Picture
    Picture
    Visit Azalea & Rosebud Knits's profile on Pinterest.

    Categories

    All
    Books
    Food
    Gardening
    Knitting
    Quilting
    Sewing

    Archives

    May 2017
    December 2016
    November 2016
    August 2016
    May 2016
    April 2016
    March 2016
    February 2016
    January 2016
    December 2015
    November 2015
    October 2015
    September 2015
    August 2015
    July 2015
    June 2015
    May 2015
    April 2015
    March 2015
    February 2015
    January 2015
    December 2014
    November 2014
    October 2014
    September 2014
    August 2014
    July 2014
    June 2014
    May 2014
    April 2014
    March 2014
    February 2014
    January 2014
    December 2013
    November 2013
    October 2013
    September 2013
    August 2013
    July 2013
    June 2013
    May 2013
    April 2013
    March 2013
    February 2013
    January 2013
    December 2012
    November 2012
    October 2012
    September 2012
    August 2012

    RSS Feed

Powered by Create your own unique website with customizable templates.