Azalea and Rosebud Knits
  • Blog
  • Patterns
    • Hats >
      • Roelle Hat
      • Winterset Hat
      • Design Your Own Hat
      • Valentine Cables Hat
      • Kilbourne Hat
      • Etoile Hat
      • Glenrowan Hat
      • Button box cloche
      • Adora Hat
      • Aster Hat
      • Argyle Cabled Beret
      • Zoey Star Beret
      • Cairo Hat
      • Honeycomb Hive Hat
      • Lakkos Cloche
    • Pullovers & Cardigans >
      • Noemy Pullover
      • Yvaine Cardigan
      • Daiva Cardigan
      • Trail Henley
      • Salisa Cardigan
      • Thara Cardigan
      • Dealla Cardigan
      • Shiloh Sweater
      • Katrina Pullover
      • Liana Cardigan
      • Jocasta Pullover
      • Edythe Pullover
      • Ripple Edge Cardigan
      • Kaleidoscope Pullover
      • Sunsine & Rain Henley
      • Begonia Pullover
      • Climbing Rose Henley
      • Irisa Cardigan
      • Makalu
      • Sinai
      • Sand Dollar Cardigan
      • Nopales
      • Lava Rock Cardigan
      • Sharee Cardigan
      • Annalise Pullover
      • Starbrook Pullover
      • Rosemary Cardigan
      • Alison Pullover
      • Edelweiss Cardigan
      • Minnette Pullover
      • Erte Cardigan
      • Nocturnal Pullover
      • Morrison Cardigan
      • Wessex Cardigan
      • Valhalla
      • Leftovers for dinner
    • Tees & Tanks >
      • Cowesett Tee
      • Janesse Pullover
      • Kayleen Pullover
      • Tiye
      • Dahshur
      • Rhodora
      • Jacaranda Tunic
      • Sakura Tee
      • Sunburst Tee
      • Lindell Tee
      • Adeline Camisole
    • Vests & Shrugs >
      • Elephant Vest
      • Elephant Safari Children's Vest
      • Rimrock Vest
      • Bartram Vest
      • Karnak Vest
      • Dark Lotus Shrug
      • Lancero Vest
      • Aster Vest
      • Olexa Vest
      • Morocco Vest
      • Loretto Vest
      • Camellia Shrug
    • Shawls >
      • Nadina Shawl
      • Janelle Shawlette
      • Nile Valley Shawl
      • Ciara Shawl
      • Emmylou Shawl
      • Graciella Shawl
      • Djoser shawl
      • Desert Waves Scarf and Shawl
      • Blackberry Mist Shawl
      • Mariposa Shawl
      • Technidream Shawl
      • Log Cabin Shawl
      • Rosana Shawl
      • Siren Shawl
    • Scarves & Cowls >
      • Zohra Cowl
      • Esna Cowl
      • Avery
      • Lavienne Scarf
      • Joselyn Cowl
      • Jayda Cowl
      • Raissa Cowl
      • Rosewood Cowl
      • Lilka Scarf
      • Hoptree Scarf
    • Gloves >
      • Roelle Gloves
      • June Mitts
      • Cranberry Mitts
      • Cabled Heart Fingerless Gloves
    • Skirts >
      • Lucine Skirt
    • Jewelry & Other Accessories >
      • Inez Necklace
      • Bettina Headwrap
      • Saqqara Necklace
      • Endira Necklace
      • Lapis Cuff
      • Athena Headband
    • Stash-busting
  • Tutorials
    • Entrelac Tutorial
    • Double Knitting tutorial
    • Honeycomb Cables without a cable needle
    • Twisted stitches tutorial: k1tbl & p1tbl
  • eBooks
  • About
  • Contact

The Magic of Photoshop

11/16/2012

0 Comments

 
A few days ago I woke up to find it was pouring rain outside.  I had just finished a new hat and had been waiting for a cloudy day to take photos.  While most people would stay indoors, to me the diffused light was a perfect condition for taking photos and I braved the cold and went to my front porch.  I took several dozen photos; being the model and photographer makes it hard to really see what I'm doing until the photo is already taken.  I ended up with several photos I liked, but they still needed some work.  This is where the magic of Photoshop comes in.  Below is the photo I started off with.
Picture
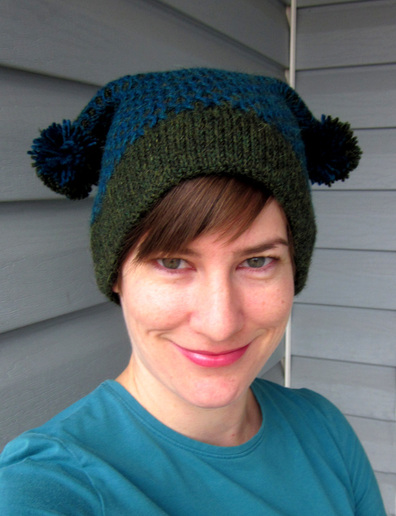
This is a goofy looking hat and I liked this photo because I have a sneaky and goofy expression on my face.  But there are a few things I didn't like: 

1.  The white vertical line in the background.  At first I almost discarded this photo because of that annoying line, but in the end I decided I liked how the hat looked and how I looked and it would be worth the effort of erasing that line.

2.  The background is completely in focus.  I'm a big fan of the photos so many knitters take of their projects where the model is completely in focus and the background is all blurry.  Even after taking the awesome Craftsy photography class called Shoot It, I still couldn't get my camera to take photos like that.  I have a simple Canon Powershot and even using the portrait mode everything still comes out in focus.

3.  The bags under my eyes and redness around my nose.  Yes, I was wearing makeup but apparently not enough of it.  I'm usually pretty light handed when it comes to makeup and usually that is fine in my everyday life but apparently I need more for photos.  Instead of re-shooting the photos I decided to digitally add some makeup.

Here is how I fixed these issues.  To begin with I made two new layers and copied the original photo in each layer.  The bottom layer remains an original photo in case I really screwed up the fixing one of the other layers and needed to start over.

1.  Begin with the middle layer; turn off the bottom and top layers so that they are invisible.  To get rid of the vertical line use the Clone Stamp tool to paint over the white line, extending a little bit from each side of the wall.

2.  Blur this entire layer like crazy.  I used the Smart Blur until I thought it looked right.  Now everything is out of focus, right?  This is where the topmost layer comes in.  For now, go ahead and turn off the middle layer so that it is invisible.

3.  Turn on the top layer.  Erase all the background leaving only the model.  Since most the background is relatively the same color, use the Magic Wand tool to select big chunks of the background.  Clean it up with the Eraser tool.  Now for the makeup.  Add a new layer.  I like to add my makeup job on a layer of its own so I can periodically turn it on and off to make sure it is still looking close to realistic.  I want to look like a better version of me, not a Barbie doll mask.  Using a combination of the Clone Stamp and Paintbrush tools paint over the imperfections.  It takes practice to really get the shades right.  If you don't like it, don't be afraid to erase what you've done and start over; that's why we are painting the makeup on a separate layer.

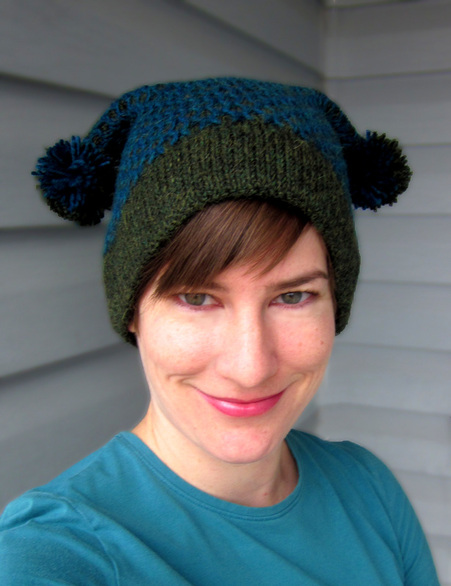
Now turn on the middle layer.  Nice fuzzy background with a model in focus that looks very well rested.  I like to save this as a .psd file in case I want to go back and fix it more then also as a .jpeg for the pattern and Ravelry photos.

And, BOOM, here it is.
Picture
0 Comments

Adventures in Sewing: Formal Gown

11/14/2012

1 Comment

 
My adventures in sewing began long ago.  While growing up my mom made a lot of my clothes.  She usually let me pick out the fabric and most of the time it came out of the quilting section and involved lots of flowers.  Even as a teenager in my 'wear all black stage' she made some of my clothes even though they looked a bit strange to her.  My skirts were never more than a couple inches above the knee, and my tops never showed a ridiculous amount of cleavage, so she would just say "You're wearing THAT to school??" then let me on my way.  Around that time I wanted to learn how to sew, and after watching her for so many years I was able to figure out the easy stuff and asked her for help on the hard stuff.  
While in college I found myself sewing on an almost daily basis for homework assignments, so my sewing skills quite improved.   For awhile I stopped sewing for myself, mostly because of long work hours that sapped all my time and energy.  Once I changed occupations and found myself with more spare time I started sewing again.  I am at the age where I'm too old to shop at Forever 21 and too young for the missy department of Macys.  The hemlines on dresses seem to be getting ridiculously short so I turned to making my own, mostly retro style dresses with full skirts.  

At the end of this month I get to go with my husband to a military ball.  I spent a lot of time looking for a formal dress and failed dismally.  After working the fashion industry, I know how much it REALLY costs to make clothes and I'm sad to say that the markup on formal dresses is outlandish.  I didn't want to spend more than $200, and every dress I looked at was made of cheap fabric and horrible workmanship.  I finally gave up and decided it was time to dust off the sewing machine.  

My sewing skills are nowhere near as good as my mom's, but as long as the pattern wasn't too complicated I figured I could handle it.  After searching and searching through all the major pattern catalogs I decided on New Look 6401, View A.  I love gowns that lace up the back, and with only a few princess seams and gathers on the bodice it didn't look too difficult for me to make.  For fabric, I had a hard time deciding what I wanted.  I wandered around Joann for a long time.  Satin wrinkles like crazy and isn't always flattering.  Taffeta would be too stiff for this kind of design.  I wanted something drapey that wasn't so slippery it would make me pull my hair out.  Then I passed by a section of brocade and stopped in my tracks.  Among the Asian inspired patterns was a beautiful floral pattern of silver with yellow and grey flowers.  That was it for me!! 
Picture
I wanted to do this right and not rush through it, so I knew I needed to make a practice dress.  Doing so would enable me to a) be sure I could actually sew this pattern and b) have a good fit.  Getting a custom fit is one of the great things about sewing your own clothes.  Picking out a size to start with can be a bit daunting if you are not the 'average' of your size.  One of the most important things when sewing (and knitting!) your own clothes is to know your body shape and any relevant sizing issues.  Hardly anyone fits the standard size.  For myself, I am one size smaller on top than on bottom, very small across the back and have very sloping shoulders.  When choosing your size for a sewing pattern, start off by looking at the bust, waist and hip measurements on the pattern envelope, but also check the *finished* measurements printed on the pattern pieces.  The amount of ease added into a pattern will vary, so don't be afraid to take the time and measure yourself.  After checking the measurements I decided on a size 12.  

I already knew I wanted to alter the bodice to cover up more of the chest area.  With a pencil I traced the bodice piece onto a scrap of interfacing.  Then I pinned it onto my dress form (which is pretty darn close to being my size), being careful to take the seam allowances into account.  Then I re-drew the neckline into a surplice, therefore making the fronts cross over and raising the lowest point of the neckline.  I outlined my new pattern piece in felt tip pen, being sure to transfer all the original notches and marked points and adding in my own notch at center front.

I was ready to sew my practice dress.  I didn't add in the lining or zipper or even finish all the edges.  I just wanted to get an idea on the fit.  In about 3 hours I cut and sewed my funny looking practice dress made of scrap fabric.  The neckline gaped open a bit but the rest fit fine.  I fixed the neckline issue by taking off half an inch of length at the shoulders (thank you sloping shoulders!) and dropping the lowest point of the armhole by half an inch.  Now the neckline fits smoothly across the bust.  Here is me looking rather silly in my practice dress.  I made it short because I figured there wouldn't be any fit issues with the lower part of the skirt.  And oh yeah, I did a great job of sewing the right side of the bodice to the wrong side of the skirt.  I almost ripped it out, but then figured if I needed to take in the waist or hips the seams were right there ready to pin.  Oh well.
Picture
I knew brocade unravels like crazy, so I got out my serger and overlocked all the edges after cutting out the dress pieces.  I carefully marked all the notches with tailors chalk since they would be cut off.  It was a relatively easy sewing experience, the only problem being me interpreting the directions incorrectly and sewing the wrong pieces together, and sewing an invisible zipper for the first time.  For $70 I have myself a custom made dress that fits perfectly and doesn't make me feel like an old lady stuffed into a cheesy prom dress.  Still needs a good pressing, but here it is.
Picture
1 Comment

Log Cabin Shawl: testers needed

11/7/2012

0 Comments

 
Picture
My Log Cabin Shawl pattern is back from editing and is ready for testing.  I am testing it through the Free Pattern Testers group.  If you are interested in testing, you can sign up here.  

The Log Cabin Shawl is constructed with striped modular squares, triangles and rectangles. It is begun at the corner triangle and can be made to any size in any weight of yarn.

Pictured are two versions; a 2 color sock weight version and a multi-color worsted weight version. The worsted weight version is made with one ball of yarn for the main color and leftover bits of other colors. The worsted weight version shows the optional crochet edging.

FINISHED MEASUREMENTS
Both versions are 54” across long edge and 24” deep at center.

0 Comments
    Azalea & Rosebud Knits
    Picture

    Author

    Cassie loves to knit, read and cook.  She sometimes does all three at the same time.

    Picture
    Picture
    Picture
    Visit Azalea & Rosebud Knits's profile on Pinterest.

    Categories

    All
    Books
    Food
    Gardening
    Knitting
    Quilting
    Sewing

    Archives

    May 2017
    December 2016
    November 2016
    August 2016
    May 2016
    April 2016
    March 2016
    February 2016
    January 2016
    December 2015
    November 2015
    October 2015
    September 2015
    August 2015
    July 2015
    June 2015
    May 2015
    April 2015
    March 2015
    February 2015
    January 2015
    December 2014
    November 2014
    October 2014
    September 2014
    August 2014
    July 2014
    June 2014
    May 2014
    April 2014
    March 2014
    February 2014
    January 2014
    December 2013
    November 2013
    October 2013
    September 2013
    August 2013
    July 2013
    June 2013
    May 2013
    April 2013
    March 2013
    February 2013
    January 2013
    December 2012
    November 2012
    October 2012
    September 2012
    August 2012

    RSS Feed

Powered by Create your own unique website with customizable templates.