Azalea and Rosebud Knits
  • Blog
  • Patterns
    • Hats >
      • Roelle Hat
      • Winterset Hat
      • Design Your Own Hat
      • Valentine Cables Hat
      • Kilbourne Hat
      • Etoile Hat
      • Glenrowan Hat
      • Button box cloche
      • Adora Hat
      • Aster Hat
      • Argyle Cabled Beret
      • Zoey Star Beret
      • Cairo Hat
      • Honeycomb Hive Hat
      • Lakkos Cloche
    • Pullovers & Cardigans >
      • Noemy Pullover
      • Yvaine Cardigan
      • Daiva Cardigan
      • Trail Henley
      • Salisa Cardigan
      • Thara Cardigan
      • Dealla Cardigan
      • Shiloh Sweater
      • Katrina Pullover
      • Liana Cardigan
      • Jocasta Pullover
      • Edythe Pullover
      • Ripple Edge Cardigan
      • Kaleidoscope Pullover
      • Sunsine & Rain Henley
      • Begonia Pullover
      • Climbing Rose Henley
      • Irisa Cardigan
      • Makalu
      • Sinai
      • Sand Dollar Cardigan
      • Nopales
      • Lava Rock Cardigan
      • Sharee Cardigan
      • Annalise Pullover
      • Starbrook Pullover
      • Rosemary Cardigan
      • Alison Pullover
      • Edelweiss Cardigan
      • Minnette Pullover
      • Erte Cardigan
      • Nocturnal Pullover
      • Morrison Cardigan
      • Wessex Cardigan
      • Valhalla
      • Leftovers for dinner
    • Tees & Tanks >
      • Cowesett Tee
      • Janesse Pullover
      • Kayleen Pullover
      • Tiye
      • Dahshur
      • Rhodora
      • Jacaranda Tunic
      • Sakura Tee
      • Sunburst Tee
      • Lindell Tee
      • Adeline Camisole
    • Vests & Shrugs >
      • Elephant Vest
      • Elephant Safari Children's Vest
      • Rimrock Vest
      • Bartram Vest
      • Karnak Vest
      • Dark Lotus Shrug
      • Lancero Vest
      • Aster Vest
      • Olexa Vest
      • Morocco Vest
      • Loretto Vest
      • Camellia Shrug
    • Shawls >
      • Nadina Shawl
      • Janelle Shawlette
      • Nile Valley Shawl
      • Ciara Shawl
      • Emmylou Shawl
      • Graciella Shawl
      • Djoser shawl
      • Desert Waves Scarf and Shawl
      • Blackberry Mist Shawl
      • Mariposa Shawl
      • Technidream Shawl
      • Log Cabin Shawl
      • Rosana Shawl
      • Siren Shawl
    • Scarves & Cowls >
      • Zohra Cowl
      • Esna Cowl
      • Avery
      • Lavienne Scarf
      • Joselyn Cowl
      • Jayda Cowl
      • Raissa Cowl
      • Rosewood Cowl
      • Lilka Scarf
      • Hoptree Scarf
    • Gloves >
      • Roelle Gloves
      • June Mitts
      • Cranberry Mitts
      • Cabled Heart Fingerless Gloves
    • Skirts >
      • Lucine Skirt
    • Jewelry & Other Accessories >
      • Inez Necklace
      • Bettina Headwrap
      • Saqqara Necklace
      • Endira Necklace
      • Lapis Cuff
      • Athena Headband
    • Stash-busting
  • Tutorials
    • Entrelac Tutorial
    • Double Knitting tutorial
    • Honeycomb Cables without a cable needle
    • Twisted stitches tutorial: k1tbl & p1tbl
  • eBooks
  • About
  • Contact

DIY Fabric Weights

6/28/2014

0 Comments

 
Last week I happened to see a new sewing book at my library, Me & My Sewing Adventure by Kate Haxell.  Being a sucker for sewing books, of course this one (and five others) came home with me.  Along with very useful information on sewing different seams, finishes and trims, there are instructions on how to make your own fabric weights.

I have heard over and over again that using weights to hold down your pattern is better than using pins, since pins can distort the pattern somewhat.  But finding pattern weights is another story.  The only ones I have been able to find were made by Dritz, and were $13.99 for 4!!  I bought them grudgingly, even with my 50% off coupon I thought they were expensive.  I tried to think of how to make them myself, but couldn't come up with any great ideas.  When four weights didn't prove to be enough while cutting out a pair of pants, tomato sauce and salmon cans had to step in but were awkward to cut around. 

So, then I find this sewing book, with the suggestion to use a stack of 3 large washers wrapped in fabric to make your own fabric weights.  While I do have lots of scrap fabric, I have even more teeny tiny balls of yarn that I just don't have the heard to throw out.  Perfect project for only a few yards of yarn!
Picture
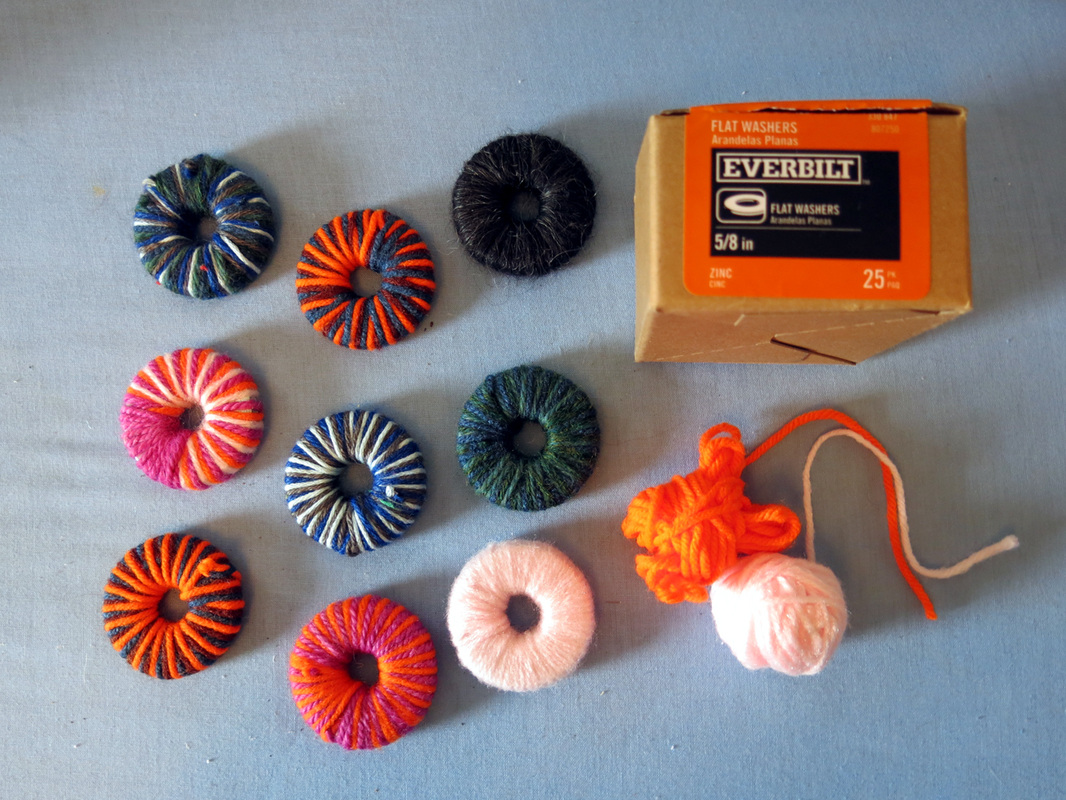
Luckily, my husband was already on his way to the hardware store, so I asked him to buy me the biggest washers he could find.  He came home with these-- the box says 5/8", but they were huge so I'm guessing the 5/8" is the size of the hole in the middle.  Can you tell I'm completely hopeless with tools?  

I made the light pink weight first, and using only one strand of yarn seemed to take forever to wrap.  So I started to use two and three strands together and it went much faster, and also turned out much more colorful! 

The box of washers was somewhere between $6-7, and I already had the yarn, so I think that is a pretty good deal for 9 fabric weights.  I can't wait to use them!  I'm off now to cut out my first knit t-shirt...
0 Comments

Anna Cross Over Bra by Ohh Lulu

6/26/2014

0 Comments

 
It gets hot here, very hot and very humid.  Last week it got up to 100 with about 80% humidity and when I stepped outside I felt like I was suffocating.  I did a quick run to the grocery store, and by the time I got home my clothes were soaked.  Not fun.  Especially not fun was the feeling of my bra being a wet sponge.  What to do?  Time to find an all-cotton bra.  I soon found out this was not an easy task; the only thing even close in the stores were sports bras, which don't look so great under a tee shirt.  So, time to make my own.  

My initial search only resulted in patterns for highly structured underwire bras.  As fantastic as it would be to make a custom fit bra, I am not really willing to put in the time and effort for that much construction.  I wanted something simple.  Eventually I came across Ohh Lulu's lingerie patterns, both on Etsy and Craftsy.  Very cute, vintage-style bras and underwear.  Even though there weren't any projects or reviews, I decided to try out the Anna Cross Over Bra. 
Picture
First attempt, learned what not to do.
Picture
Second attempt, much better!
The instructions:  Now, the description of the pattern is very upfront about saying that you need to have experience sewing with knits and applying lingerie elastic.  I have little-to-no experience with either, so I knew some YouTube videos were in my future. 

The pattern:  The sizing for this bra threw me off a bit.  According to the pattern I would need an x-small.  I haven't been an x-small in anything since I was in 8th grade, so I didn't trust the pattern and cut a size small instead.  Big mistake.  While my bra is wearable, the cups are really big.  

For my second attempt I used an x-small and the fit is much better.  Near the end of the instructions, when sewing on the straps, it says to use the star symbol on the back pattern piece to align the edge of the strap.  I looked twice and couldn't find any star symbol anywhere, so I had to make it up.  Before I made my second attempt, I was able to email the designer and she sent me a very polite and prompt reply with updated instructions on the back strap placement.  Bonus points for awesome customer service!  Ohh Lulu is getting more business from me in the future.  

The fabric:  For the first attempt I used a cotton/lycra jersey, purchased from Girl Charlee, both as the self and lining.  This sounded like a good idea, but as I was adding the band elastic, I realize it was way too bulky.  As the name of this style implies, it crosses over in the front, so for several inches you are dealing with 4 layers of fabric.  When I turned back the elastic to the wrong side it was very bulky and my zig-zag stitched elastic doesn't lay flat.  So keep in mind, if you're going to use a lining, keep it thin.  For the second attempt, I used plain cotton jersey leftover from my Moneta dress and some dri-wicking fabric I found as a remnant at Joann.

The elastics:  Where to find lingerie elastic???  While Hancock Fabrics has started to carry lingerie elastics, they are quite expensive--$2-3 for one yard.  After my first attempt proved that my picot elastic wasn't sturdy enough for a bottom band, I did cave in and buy 3/4" brushed back elastic.  I used it for my second attempt and it is infinitely better than the picot elastic.  I will save the picot elastic for a style of bra that only uses one or two layers of fabric.  

I knew that buying elastic in bulk would be far cheaper.  I ended up finding the three different elastics I needed at Sew Sassy Fabrics.  There was the foldover elastic, picot edge band elastic and strap elastic.  The difficult part was trying to get them all to match in color.  Obviously my elastics didn't end up matching in the first attempt.  For the second attempt I just used white elastics and straps.  

My changes:  For the first attempt I didn't use an adjustable strap, just cut two lengths of strap elastic, sewed them to the back, then tried on the bra and adjusted the length to my liking and pinned to the front. But the elastic I used proved to not be sturdy enough and the cups keep sagging.  I also didn't add the hook and eye closure; the bra was big enough for me to just sew a center back seam and slip it on over my head.  

For the second attempt I followed the directions and used the adjustable straps and added the hook and eye closure.  On this one I also added some cotton batting to the lining to provide some 'coverage' if you get my drift.  I cut out circles about 3" in diameter.  Once the front cups were sewn, I tried one on to figure out the placement and used a large zig-zag stitch to sew the batting to the wrong side of the lining.  

So, here are my final conclusions:  Cute and comfortable design.  If you choose the right size and the right elastics it will fit well.  Choose your fabrics carefully so that you don't end up with too much bulk.  For the elastics, be sure the bottom band elastic is sturdy enough to handle several layers of fabric.  Here are a few more photos of my second attempt...
Picture
Inside of the bra.
Picture
Front details.
Picture
Hook and eye closure was not available in white; I sewed it on a little crooked (oops).
0 Comments

Moneta Dress

6/24/2014

0 Comments

 
Here it is, my first knit sewing project!  Pattern is Moneta by Colette Patterns.  In fact, I made this as part of the Moneta Sewalong.  
Picture
Awhile back when Sarai of Colette Patterns first announced that she was coming out with a book on sewing with knits, she put out a really awesome deal on her website for pre-ordering the book plus two knit patterns as a bundle.  The catch was that the patterns hadn't been released yet, so it was a mystery what I was buying.  Normally I wouldn't buy something without knowing what it was, but Sarai's style really speaks to me, so I doubted that I would hate anything that she designed.  I ended up receiving Moneta, the exact type of knit dress that I would wear, and Mabel, a pull-on pencil skirt, which is exactly the kind of skirt that my husband thinks I should wear (haha).

The fabric I chose for my Moneta was a medium weight light heather grey jersey.  As much as I love the feel of bamboo and rayon knits, I didn't want to deal with something slippery on my first try with knits.  I chose to do version 1, the sleeveless lined version, with the roll collar from the Moneta Extras download.  I'm not the best photographer, and I took photos with three different backgrounds, and my dress just kept getting blown out into a giant blob of bright white.  Sigh.  If only I could get my camera to cooperate.  

My measurements are all over the board (as usual), with my bust in-between a small and medium, my waist technically a large, and my hips a medium.  Always the waist that gets me in trouble.  Well, I chose to make a size medium since it would stretch and hopefully fit my waist.  The fit was pretty good, except for a substantial gap in the armhole.  I was a little irked that the pattern said to fit as you go, but then said that you couldn't try it on after sewing the side seams because you might stretch out the waist.  I guess I should have ignored that and tried it on anyway, because I didn't notice the armhole gap until the whole thing was finished.  I really didn't want to rip out overlock stitch (ugh) and undo the lining (double ugh).  So, as my mom says, just keep moving and no one will notice.  Or wear it with a cardigan.  Either way, it's not devastating.  

But how to fix the pattern for next time? I should know since I have an actual degree in design and took 6 quarters of pattern drafting classes.  But, sadly, almost all the curriculum was based on wovens and about one week was dedicated to knits.  I would know how to fix it if this was a woven, but there are no darts, and shouldn't be in a knit pattern.  I remembered at my old job the patternmaker sort of smushing out the excess in the pattern piece, so I will try that.  However, I'm not sure if I should adjust the armhole if I plan to add sleeves, since that would affect the armscye circumference.  I guess I'll just worry about that when I get to that project...
0 Comments

Janelle Shawlette in Sock Yarn Shawls collection

6/19/2014

0 Comments

 
Picture
Photo courtesy of Knit Picks
Knit Picks has published a new collection of 7 shawls using their sock yarns.  I am happy to say that my pattern Janelle Shawlette is included, and also made the cover!  Woohoo!  

Janelle is pretty simple to knit, with a Stockinette stitch body and feather and fan border.  The spiraled sections are shaped with increasingly larger yarnovers.  The shape is a large circle with an opening in front, and the spiraled increases give it a swingy shape hanging down from your shoulders.

I've worked double-yarnovers in complicated lace patterns, and I really liked the effect of having different-sized holes in the lace.  I went a little crazy with that idea, and used up to quadruple-yarnovers in this design.  Working into double-, triple-, or quadruple-yarnovers isn't as complicated as it sounds; you just need to alternately work knits and purls into the yarnovers, and will end up with a big eyelet.
Knit Picks has an interesting way of working with designers; the sample that ends up being photographed is knit by a sample knitter and not the designer.  So I will present the photos of my sample to better illustrate the shape of the shawl.  The yarn is Stroll Hand-Painted in the colorway Make Believe.
Picture
Picture
Picture
So, if you are interested, you can find Janelle on the Knit Picks website, as a printed book or ebook of Sock Yarn Shawls collection or as a single pattern download.

Until next time, Happy Knitting!
0 Comments

Tiye

6/16/2014

0 Comments

 
On this hot, almost-summer day I'd like to introduce Tiye, a circular yoke pullover tee.  
Picture
Picture
Picture
Tiye is my first circular yoke sweater, and I loved it!  After seeing so many beautiful stranded ski sweaters I decided I needed to try this construction.  It was fun to knit and I think this style of sweater is flattering on me.  I'm already dreaming of making a stranded colorwork circular yoke sweater for cold weather.  

I've already mentioned how much I enjoyed the lovely sock yarn used in this project.  The contrast color doesn't use up much yardage, so it would be a good way to use up a bit leftover from making socks.  I still have the remainder of my skein, and probably enough to make a nice shawl.

Here are the pattern particulars:

Tiye, named after one of the queens of Ancient Egypt, is a short-sleeved, round yoke tee. The contrasting bands of eyelet in the yoke are inspired by the elaborate collar necklaces worn by Egyptian royalty. Tiye is worked in the round from the top down, with bust and hip darts for a fitted shape. The simple stitch patterns highlight the lovely variations in hand-dyed sock yarn. Shown in size 34” with 1” negative ease.

FINISHED MEASUREMENTS
Chest: 32 (34, 36.25, 38.5, 40, 42, 44.25)[ 46.5, 48, 50, 52, 54.5, 56]”
Length: 22.75 (23, 23.25, 23.5, 23.75, 24, 24.25)[24.5, 24.75, 25, 25.25, 25.5, 25.75]”

MATERIALS
Blacksheep Dyeworks Sock Weight Superwash Merino Wool Yarn (100% superwash merino wool, 428 yds/391 m per 100 g skein)
MC: Ink Tonal 2 (2, 2, 2, 2, 2, 3)[3, 3, 3, 3, 3, 3] skeins
CC: Copper 1 skein for all sizes

Approximate yardage needed:
MC: 600 (640, 695, 730, 775, 815, 875)[915, 960, 1005, 1070, 1110, 1160] yds
CC: 40 (40, 45, 45, 50, 50, 55)[55, 60, 60, 65, 70, 70] yds

NEEDLES
US #4/3.5 mm 16”, 24”, 36” circular needles and set of dpns
US#3/3.25 mm 16”, 36” circular needles and set of dpns

NOTIONS REQUIRED
stitch holders
tapestry needle to weave in ends
5 stitch markers

GAUGE
22 sts and 31 rnds = 4” in Stockinette stitch worked in the round on larger needles

SKILLS REQUIRED 
working in the round 
short rows 
RLI and LLI (lifted increases) 
k2tog 
ssk

$6.00
0 Comments

Sneak Peek

6/6/2014

0 Comments

 
Hello, friends!  I've got a surprise for you today, a sneak peek at a new design.  Here it is:
Picture
This design is part of my Dreaming of Egypt collection.  I finished typing the pattern yesterday and sent it off to my editor this morning.  Hopefully it will be finished sometime this week. 

What to make when it is 95 degrees with 90% humidity???  A lightweight tee, of course.  Cotton yarn and I have never really gotten along, and I find cotton handknits to be too heavy and bulky for my taste.  So I stick with wool and wool blends even in hot weather.  Surprisingly, they are quite comfortable.  Wool can be lightweight and have good wicking properties; I think the key is the thickness of the fabric. 

The yarn used here is a sock weight from Blacksheep Dyeworks on Etsy, and  I absolutely loved working with it.  Every time I see a Blacksheep Dyeworks banner on Ravelry, the saturated colors catch my eye.  I finally dove in and bought several skeins and was more than pleased with the beautiful colors.  The yarn itself is tightly spun and retains a beautiful sheen.  Love love love! 

I have two more skeins in a mossy green in my stash, and I'm already dreaming of what to knit with them.  I'm thinking a henley top with elbow length sleeves.  I was able to make this short sleeved top with about 600 yards, and with 850 yards in my stash I think I can make it, maybe even down to 3/4 sleeves.  Using size 3 needles (probably a size 4 for tighter knitters) creates a perfect fabric that is lightweight but not see through, and comfortable enough to wear indoors.

What are you working on in the hot weather?  
0 Comments
    Azalea & Rosebud Knits
    Picture

    Author

    Cassie loves to knit, read and cook.  She sometimes does all three at the same time.

    Picture
    Picture
    Picture
    Visit Azalea & Rosebud Knits's profile on Pinterest.

    Categories

    All
    Books
    Food
    Gardening
    Knitting
    Quilting
    Sewing

    Archives

    May 2017
    December 2016
    November 2016
    August 2016
    May 2016
    April 2016
    March 2016
    February 2016
    January 2016
    December 2015
    November 2015
    October 2015
    September 2015
    August 2015
    July 2015
    June 2015
    May 2015
    April 2015
    March 2015
    February 2015
    January 2015
    December 2014
    November 2014
    October 2014
    September 2014
    August 2014
    July 2014
    June 2014
    May 2014
    April 2014
    March 2014
    February 2014
    January 2014
    December 2013
    November 2013
    October 2013
    September 2013
    August 2013
    July 2013
    June 2013
    May 2013
    April 2013
    March 2013
    February 2013
    January 2013
    December 2012
    November 2012
    October 2012
    September 2012
    August 2012

    RSS Feed

Powered by Create your own unique website with customizable templates.