
It can get very hot where I live, and both the summers I have been here I have wondered why on earth I am running the dryer when I could be drying my clothes for free in the heat. My husband has been accumulating more and more laundry than needs to be air dried, and my collapsible drying rack just can't hack it anymore. Finally, I have myself a clothesline! Yay! I used it for the first time and discovered two things:
1. Since I'm not using dryer sheets, fabric softener is very necessary. Luckily it was just towels I washed, and they were so stiff I could have leaned them up against the wall.
2. I need some sort of receptacle to hold my clothespins, because a handful is definitely not enough.
To solve problem #1, I decided to make my own fabric softener. More and more I'm trying to make my own cleaning products, and I suppose laundry supplies are next on my list. I'm going to try the vinegar-hair condition concoction, which were most of the recipes I found online. We'll see how that goes!
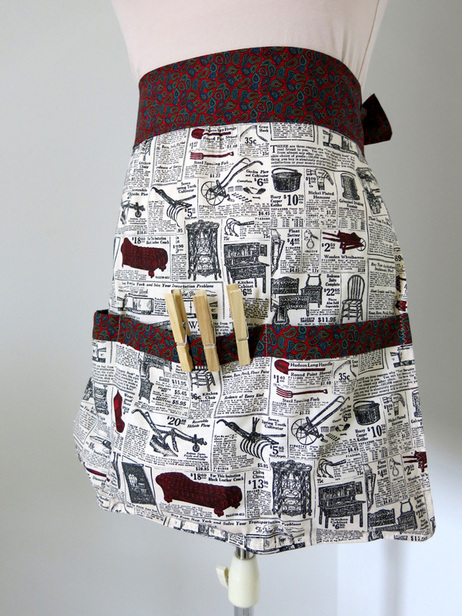
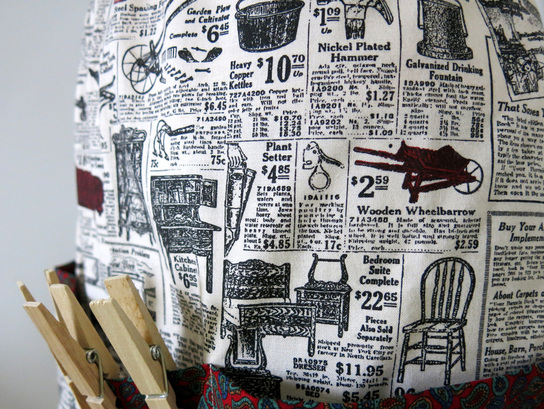
To solve problem #2 I continued my apron-making kick and made a half-apron with deep pockets. I spent quite a long time last night going through my quilt fabric stash, and at the bottom of the bin I found this hilarious print that looks like an old-fashioned Sears & Roebuck catalog. Well, a clothesline is pretty old-fashioned, so it seemed appropriate.
1. Since I'm not using dryer sheets, fabric softener is very necessary. Luckily it was just towels I washed, and they were so stiff I could have leaned them up against the wall.
2. I need some sort of receptacle to hold my clothespins, because a handful is definitely not enough.
To solve problem #1, I decided to make my own fabric softener. More and more I'm trying to make my own cleaning products, and I suppose laundry supplies are next on my list. I'm going to try the vinegar-hair condition concoction, which were most of the recipes I found online. We'll see how that goes!
To solve problem #2 I continued my apron-making kick and made a half-apron with deep pockets. I spent quite a long time last night going through my quilt fabric stash, and at the bottom of the bin I found this hilarious print that looks like an old-fashioned Sears & Roebuck catalog. Well, a clothesline is pretty old-fashioned, so it seemed appropriate.
I had a big *duh* moment the last week while looking at sewing patterns and not finding what I wanted; I realized that I really should use my fashion design degree and draft my own patterns. Yes it will take more time, but I can get exactly what I want and hopefully get a better fit. I have one of those basic bodice and skirt patterns, I just need to take the time to make up the muslins and get a good fit.
For now I'll deal with rectangles and design my own apron. I had to alter my original dimensions to fit the amount of fabric I had, but overall I am pleased with how it came out. I think I had about half a yard of each fabric. If you want to make one for yourself, here are the basics:
Main fabric:
body: 23" x 16"
pocket: 23" x 16"
Contrast fabric:
waistband: 18" x 6"pocket band: 23" x 3"
ties: 22" x 6" cut 2 [I made them only 22" long because of a lack of fabric; if you have enough fabric, you might want to cut them longer]
My seams were about 3/8"-1/2"; since a perfect fit wasn't necessary I sort of made it up as I went along.
1. Sew pocket band to pocket RS together with a 1/4" seam. Iron seam allowance toward band. Press under 1/4" along top edge. Fold band in half and press. Pin inside edge over seam. Stitch in the ditch on RS. [Note: I am really terrible with stitch in the ditch since I never seem to catch the loose edge on the WS. Here I used a blind hem stitch so that I was more likely to catch the edge. Sssshhh don't tell!]
2. Place RS of pocket on WS of apron, aligning bottom and side edges. This is where I messed up and had to rip out since I'm so used to putting things RS together. Sew with a 1/2" seam; turn out and press. Fold back remaining seam allowance on apron sides into a 1/4" narrow hem. Stitch along sides and bottom with a wide zig zag or straight stitch.
3. Fold the apron across into thirds and make a crease on the fold lines. Mark a dashed line on the creases of the pocket section with a fabric pen. Sew a straight stitch over the lines to create a three section pocket.
4. Sew ties to each side of waistband and press flat.
5. Gather top of apron to fit between seams on waistband. Stitch to waistband. Fold back seam allowance on top of waistband section only and press.
6. Fold ties in half RS together and sew, leaving waistband section open. Turn out and press. Pin waistband section over seam on WS and pin. Sew around entire waistband/ties with wide zig zag or straight stitch.
Voila! You have yourself an apron. I don't know about you, but wearing this apron might make me enjoy doing laundry just a little bit.


 RSS Feed
