
| 
|
Tips for a successful Edelweiss Cardigan
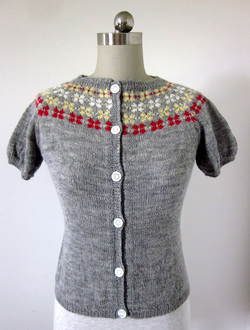
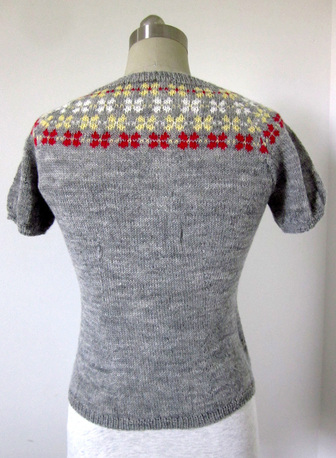
My Edelweiss Cardigan has just been published in the Spring 2013 issue of Knitscene, yay!
I think this cardigan is my favorite sweater design to date. It is lightweight and colorful and would look great over a spring dress or jeans. This design uses some techniques that might be new to some knitters, so I wanted to write this post to encourage some practice before tackling the sweater.
The gauge swatch. I know, I know. I can hear the collective groan. Gauge swatches are no fun, but it is especially important to make one for the Edelweiss Cardigan. Why? Well not only is the correct gauge critical to get the right fit, the gauge swatch also gives you a chance to practice the special techniques involved in the making of this sweater. What are those special techniques you might be wondering? Well, they are: stranded colorwork, steeking, and a sewn rib bind off. I know how you’re feeling, you’re excited to start a new project and want to do it NOW! But, please, take a couple evenings to work out all the kinks. This sweater is worked on tiny needles, so for the leisurely knitter it could be several months of work. I really want everyone working up this pattern to be SUCCESSFUL so take the time and save time, right? A stitch in time saves nine? Too corny? Ok, I’ll get on with the explanation.
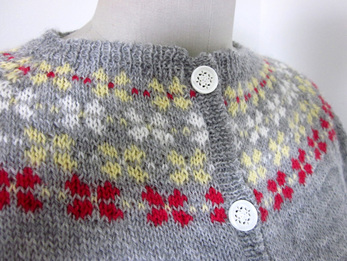
Stranded Colorwork. For the longest time I struggled with stranded colorwork. As beautiful as the designs were, I just couldn’t find a way to hold the yarns that was comfortable. I tried one strand in each hand, both strands over my right index finger, but both ways just made my hand cramp up after a couple minutes. Then, thanks to twitter, I found this video.
http://www.youtube.com/watch?v=9Bn704khnO8
One strand on either side of the index finger. It was like magic, suddenly I whizzed through the rounds like it was nothing and a pretty two color pattern emerged. I’m not saying you have to hold your yarn this way; I’m saying experiment until you find a method that is comfortable for YOU! Another thing about stranded colorwork is that it is easy to pull the floats too tight. Check out this blog post by Eunny Jang which explains how to keep those floats nice and loose, plus there are answers to other questions you might have about working stranded colorwork.
http://www.eunnyjang.com/knit/2006/11/tips_tricks_and_treats.html
Steeking. Cutting into your knitting is a scary thought, and that is exactly what a steek requires you to do. This is my first design using a steek and I have to say I was a bit nervous. I found these posts by Eunny Jang that explain how to steek, and how to secure the steek, in depth and it eased my fears.
http://www.eunnyjang.com/knit/2006/01/the_steeking_chronicles_part_ii.html
I decided to secure the steek with lines of hand sewn backstitching. It seemed easier and more secure than the crochet method. A crochet steek might look nicer, but on such a tight gauge I thought it might be difficult for a first time steeker. If you want to try the crochet method, go for it! I would love to see how it comes out.
Sewn Rib Bind off. I used a tubular cast on for the rib at the neckline and wanted a matching bind off at the bottom hem. A regular sewn bind off is nice and stretchy, but doesn’t exactly blend in with the k1, p1 rib pattern. I found instructions for a perfect bind off in The Principles of Knitting by June Hemmons Hiatt on page 90, the One Needle Grafted Edge. The instructions sound a bit complicated at first, but once you get the hang of it, this bind off has an easy rhythm to work and it makes such a nice edge that blends into the rib seamlessly. Once you master the maneuvering, just remember: knit on, knit off, purl on, purl off.
Now, the actual making of the gauge swatch. I will start off by saying that I am a LOOSE knitter. Everyone has their own tension and their own style of knitting. It may be necessary to go up one or two needle sizes if you tend to knit tightly. First make a small Stockinette stitch swatch to see if you are close to getting the right gauge. Once you determine what needle size YOU need to get the right gauge, find a needle one size smaller, this will be the needle used for the ribbing. The gauge swatch needs to be worked in the round, so either use the magic loop method or use dpns.
Using the smaller needle and a tubular cast on, CO 50 sts. Make sure sts aren’t twisted, pm and join in the round K5, pm, work in k1, p1 rib to last 5 sts, pm, knit to end. Cont in patt for 1”. Change to larger needle and work in Stockinette stitch for at least 2”. Now change to the stranded colorwork and work the Steek chart,sl m, work Yoke chart once (40 sts), work steek chart. Cont in patt to end of chart. If you start to notice that the work is pulling in on the stranded colorwork then an adjustment needs to be made. Measure your gauge. Is the colorwork gauge tighter (more sts per inch) than the Stockinette gauge? Try to keep the floats looser and continue working. Still too tight? Try going up a needle size. It might be necessary for the whole stranded colorwork section to be worked on a larger needle. Once you determine how to get the right gauge for the stranded colowork section, change to the smaller needle and the main color. K5, sl m, work k1, p1 rib to m, knit to end. Cont in patt for 1”.
Now practice the sewn rib bind off. It takes a bit of practice to get the right tension. After you drop the stitch from the needle gently pull on the yarn until the loop shrinks to the right size and you will see it blend into the knitting. Once you have bound off all the stitches we are ready to steek.
My Edelweiss Cardigan has just been published in the Spring 2013 issue of Knitscene, yay!
I think this cardigan is my favorite sweater design to date. It is lightweight and colorful and would look great over a spring dress or jeans. This design uses some techniques that might be new to some knitters, so I wanted to write this post to encourage some practice before tackling the sweater.
The gauge swatch. I know, I know. I can hear the collective groan. Gauge swatches are no fun, but it is especially important to make one for the Edelweiss Cardigan. Why? Well not only is the correct gauge critical to get the right fit, the gauge swatch also gives you a chance to practice the special techniques involved in the making of this sweater. What are those special techniques you might be wondering? Well, they are: stranded colorwork, steeking, and a sewn rib bind off. I know how you’re feeling, you’re excited to start a new project and want to do it NOW! But, please, take a couple evenings to work out all the kinks. This sweater is worked on tiny needles, so for the leisurely knitter it could be several months of work. I really want everyone working up this pattern to be SUCCESSFUL so take the time and save time, right? A stitch in time saves nine? Too corny? Ok, I’ll get on with the explanation.
Stranded Colorwork. For the longest time I struggled with stranded colorwork. As beautiful as the designs were, I just couldn’t find a way to hold the yarns that was comfortable. I tried one strand in each hand, both strands over my right index finger, but both ways just made my hand cramp up after a couple minutes. Then, thanks to twitter, I found this video.
http://www.youtube.com/watch?v=9Bn704khnO8
One strand on either side of the index finger. It was like magic, suddenly I whizzed through the rounds like it was nothing and a pretty two color pattern emerged. I’m not saying you have to hold your yarn this way; I’m saying experiment until you find a method that is comfortable for YOU! Another thing about stranded colorwork is that it is easy to pull the floats too tight. Check out this blog post by Eunny Jang which explains how to keep those floats nice and loose, plus there are answers to other questions you might have about working stranded colorwork.
http://www.eunnyjang.com/knit/2006/11/tips_tricks_and_treats.html
Steeking. Cutting into your knitting is a scary thought, and that is exactly what a steek requires you to do. This is my first design using a steek and I have to say I was a bit nervous. I found these posts by Eunny Jang that explain how to steek, and how to secure the steek, in depth and it eased my fears.
http://www.eunnyjang.com/knit/2006/01/the_steeking_chronicles_part_ii.html
I decided to secure the steek with lines of hand sewn backstitching. It seemed easier and more secure than the crochet method. A crochet steek might look nicer, but on such a tight gauge I thought it might be difficult for a first time steeker. If you want to try the crochet method, go for it! I would love to see how it comes out.
Sewn Rib Bind off. I used a tubular cast on for the rib at the neckline and wanted a matching bind off at the bottom hem. A regular sewn bind off is nice and stretchy, but doesn’t exactly blend in with the k1, p1 rib pattern. I found instructions for a perfect bind off in The Principles of Knitting by June Hemmons Hiatt on page 90, the One Needle Grafted Edge. The instructions sound a bit complicated at first, but once you get the hang of it, this bind off has an easy rhythm to work and it makes such a nice edge that blends into the rib seamlessly. Once you master the maneuvering, just remember: knit on, knit off, purl on, purl off.
Now, the actual making of the gauge swatch. I will start off by saying that I am a LOOSE knitter. Everyone has their own tension and their own style of knitting. It may be necessary to go up one or two needle sizes if you tend to knit tightly. First make a small Stockinette stitch swatch to see if you are close to getting the right gauge. Once you determine what needle size YOU need to get the right gauge, find a needle one size smaller, this will be the needle used for the ribbing. The gauge swatch needs to be worked in the round, so either use the magic loop method or use dpns.
Using the smaller needle and a tubular cast on, CO 50 sts. Make sure sts aren’t twisted, pm and join in the round K5, pm, work in k1, p1 rib to last 5 sts, pm, knit to end. Cont in patt for 1”. Change to larger needle and work in Stockinette stitch for at least 2”. Now change to the stranded colorwork and work the Steek chart,sl m, work Yoke chart once (40 sts), work steek chart. Cont in patt to end of chart. If you start to notice that the work is pulling in on the stranded colorwork then an adjustment needs to be made. Measure your gauge. Is the colorwork gauge tighter (more sts per inch) than the Stockinette gauge? Try to keep the floats looser and continue working. Still too tight? Try going up a needle size. It might be necessary for the whole stranded colorwork section to be worked on a larger needle. Once you determine how to get the right gauge for the stranded colowork section, change to the smaller needle and the main color. K5, sl m, work k1, p1 rib to m, knit to end. Cont in patt for 1”.
Now practice the sewn rib bind off. It takes a bit of practice to get the right tension. After you drop the stitch from the needle gently pull on the yarn until the loop shrinks to the right size and you will see it blend into the knitting. Once you have bound off all the stitches we are ready to steek.
Follow the pattern instructions for reinforcing with a backstitch. It is easier to see what you are doing if you use a contrast color sewing thread, and since the steek will fold back to the inside of the sweater, no one will see it. Be sure to sew down the middle of each stitch, splitting the yarn plies. Now the dreaded part. Cutting the steek. Be sure to use a sharp pair of scissors. I happened to see that scissors were on sale at Joann’s and bought myself a pair of Fiskars Knitter scissors. They are short, sharp scissors with blunt (non-pointy) tips. Cut between the two middle steek stitches. Don’t worry, everything will be fine. Even if (gasp!) the first steek stitches unravel, you reinforced the next stitches so they aren’t going anywhere. Wool likes to stick to itself, and Nature Spun fingering is pretty darn sticky. I had to rip out a small section of the sewn bind off, so I know firsthand just how sticky it is! Now you have a nice flat gauge swatch. Wash gently and let it dry flat. Measure the gauge again just to be sure. That wasn’t so bad, was it? Now go on and make yourself a beautiful sweater! I can’t wait to see the projects on Ravelry. If you have any other questions or problems, please email me and I will do my best to help.


 RSS Feed
